ThermoDrain Installation Support & Sizing Guides
ThermoDrain is engineered to be one of the simplest, lowest-maintenance energy recovery loops to integrate inline. Each model comes with a comprehensive, step-by-step installation guide featuring detailed technical illustrations and plumbing diagrams. Depending on the specific configuration you choose, your system features factory-integrated potable water connections and series-specific drain attachments optimized for rapid single-person installation.
ThermoDrain Installation Made Easy
Installing next-generation drain water heat recovery (DWHR) technology has never been more straightforward. Whether you are a professional plumber completing a high-volume new build or a homeowner tackling a DIY basement remodel, ThermoDrain units are engineered to integrate seamlessly into standard residential and commercial plumbing systems.
📥 Download Official Installation Guides
- TDX Series Installation Manual (PDF Format) — [Download Here]
- TDH Series Installation Manual (PDF Format) — [Download Here]
📐 Vertical vs. Horizontal Orientation Compliance
Did you know that horizontal installation is fully possible with ThermoDrain units? Because our systems are manufactured using premium, independently certified solid copper drain pipes, they can adapt safely to custom spatial constraints.
⚠️ Important Engineering Note: All efficiency ratings, heat recovery kilowatts (kW), and performance metrics published in our official documentation are strictly rated for vertical installations. Installing a unit horizontally alters the fluid dynamics of the falling wastewater film, which will result in a lower thermal efficiency rating than a standard vertical setup.
🚰 Factory-Installed Water Fittings (Potable System Connections)
ThermoDrain units feature rugged, factory-integrated potable water connections configured to fit your specific piping strategy. TDX has 360 degree swivel for easier installation.
1. Crimp-Style PEX Fittings (ASTM F1807)
- Available on: TDX & TDH models
- The Advantage: This patent-pending, factory-installed manifold option makes connecting your domestic water supply incredibly fast. No open-flame torches are required. Simply route your standard 3/4-inch PEX lines straight to the port and secure them with a standard plumbing crimp tool.
- 🎥 [Watch this video to learn more about Crimp PEX connections.]
2. Expansion-Style PEX Fittings (ASTM F1960)
- Available on: TDX & TDH models
- The Advantage: Engineered for cold-expansion plumbing setups. This patent-pending factory option entirely eliminates soldering. The installer utilizes an expansion tool to widen the PEX tubing and sleeve, slides it over the factory fitting, and lets the pipe naturally shrink back down for a permanent, industrial-grade seal.
- 🎥 [Watch this video to learn more about Expansion PEX mechanics.]
3. Solid Copper 3/4″ Male Sweat Connections
- Available on: TDH Series Standard Units
- The Advantage: Designed for maximum layout flexibility. These fixed, high-purity copper ports arrive ready for traditional soldering (sweating) or can easily receive quick-connect mechanical adapters (such as compression fittings or push-to-connect adapters) to tie directly into any custom copper or hybrid pipe system.
✏️ Unsure which style matches your project? Review the explicit layout differences between [Crimp vs. Expansion PEX Here].
🧼 Drain Stack Connections: TDH vs. TDX
The mechanical connection method to your home or building's main drain line depends strictly on the model series and diameter size:
🔹 TDX Series: Direct ABS Solvent-Welding (Glue)
The premium TDX series features factory-integrated, impact-resistant ABS connection hubs at both ends. The unit solvent-welds (glues) directly inline into standard 3-inch residential ABS plastic drain stacks using regular plumbing cement, requiring zero mechanical bands or specialized external adapters.
🔹 TDH Series (3-Inch Diameter Models): High-Quality Mechanical Couplings Included
Every standard residential 3-inch TDH series unit ships complete with heavy-duty mechanical rubber drain couplings (such as shielded/unshielded flexible transition couplings) included inside the box, ensuring a fast, drop-in mechanical retrofit or inline installation.
🔹 TDH Series (4-Inch Commercial Models): No Couplings Included
Please note that high-capacity 4-inch diameter TDH models do not come with mechanical drain couplings. Due to the diverse nature of commercial plumbing systems—where code requirements vary between heavy-duty shielded cast iron, PVC, or copper DWV drain stacks—commercial contractors must source their own local code-compliant 4-inch mechanical transition couplings (e.g., Fernco or shielded mission bands) on-site to match the specific pipeline material of the building.
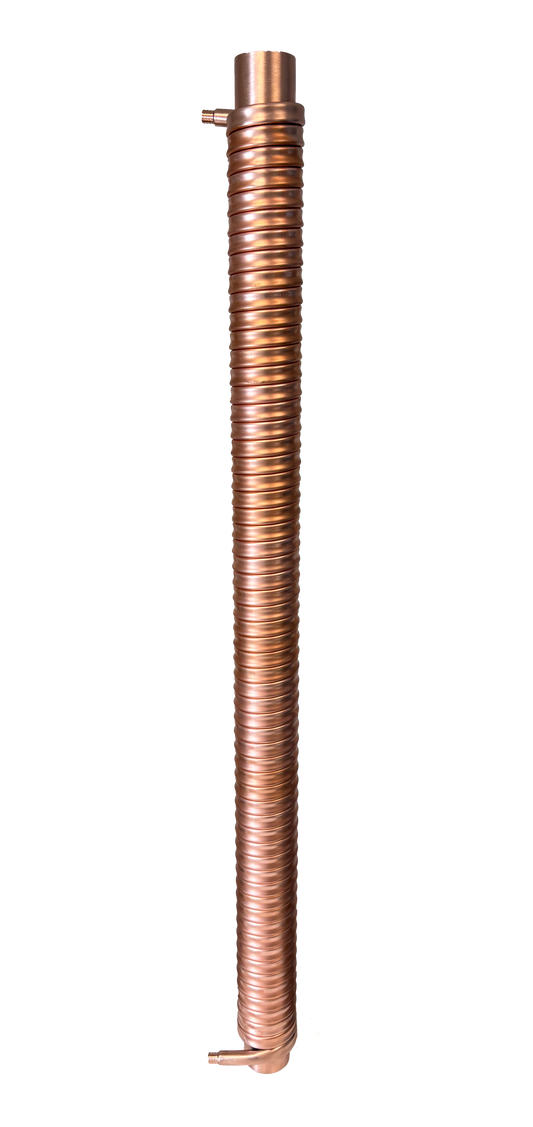
Connecting the ThermoDrain
An average inline ThermoDrain installation takes just 20 to 45 minutes and requires roughly $30 to $50 in basic structural plumbing parts.
Every TDX and TDH model is engineered specifically for a fast, one-person installation where joist or wall cavity space is at a premium. Both series feature an ultra-low pressure drop profile and industry-leading passive heat transfer rates.
- TDX Series Connections: Outfitted with factory-integrated, female ABS drain connection hubs, the TDX welds directly onto your standard residential 3-inch ABS plastic drain stack using standard solvent plumbing cement.
- TDH Series Connections (3" Models): Every standard 3-inch TDH residential system comes bundled with heavy-duty mechanical rubber drain couplings custom-fitted to your unit's exact specifications. (Note: Commercial 4-inch TDH models do not include drain couplings).
- Potable Water Supply: Ships with your choice of factory-installed ASTM F1807 Crimp PEX ports, ASTM F1960 Expansion PEX ports, or fixed 3/4" male copper sweat connections to fit any home layout seamlessly.
Simple Step-by-Step Installation
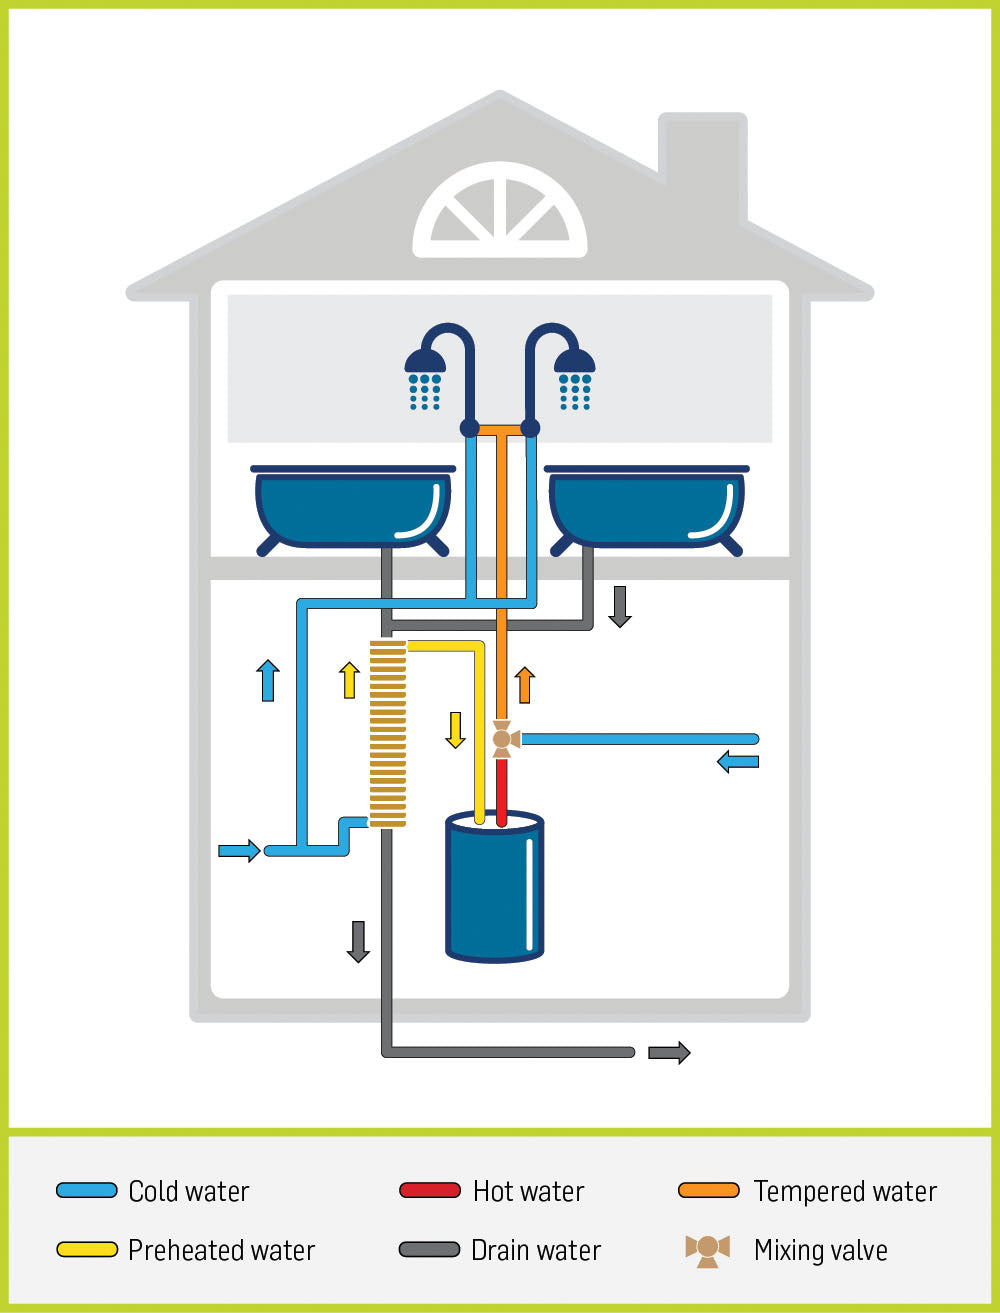
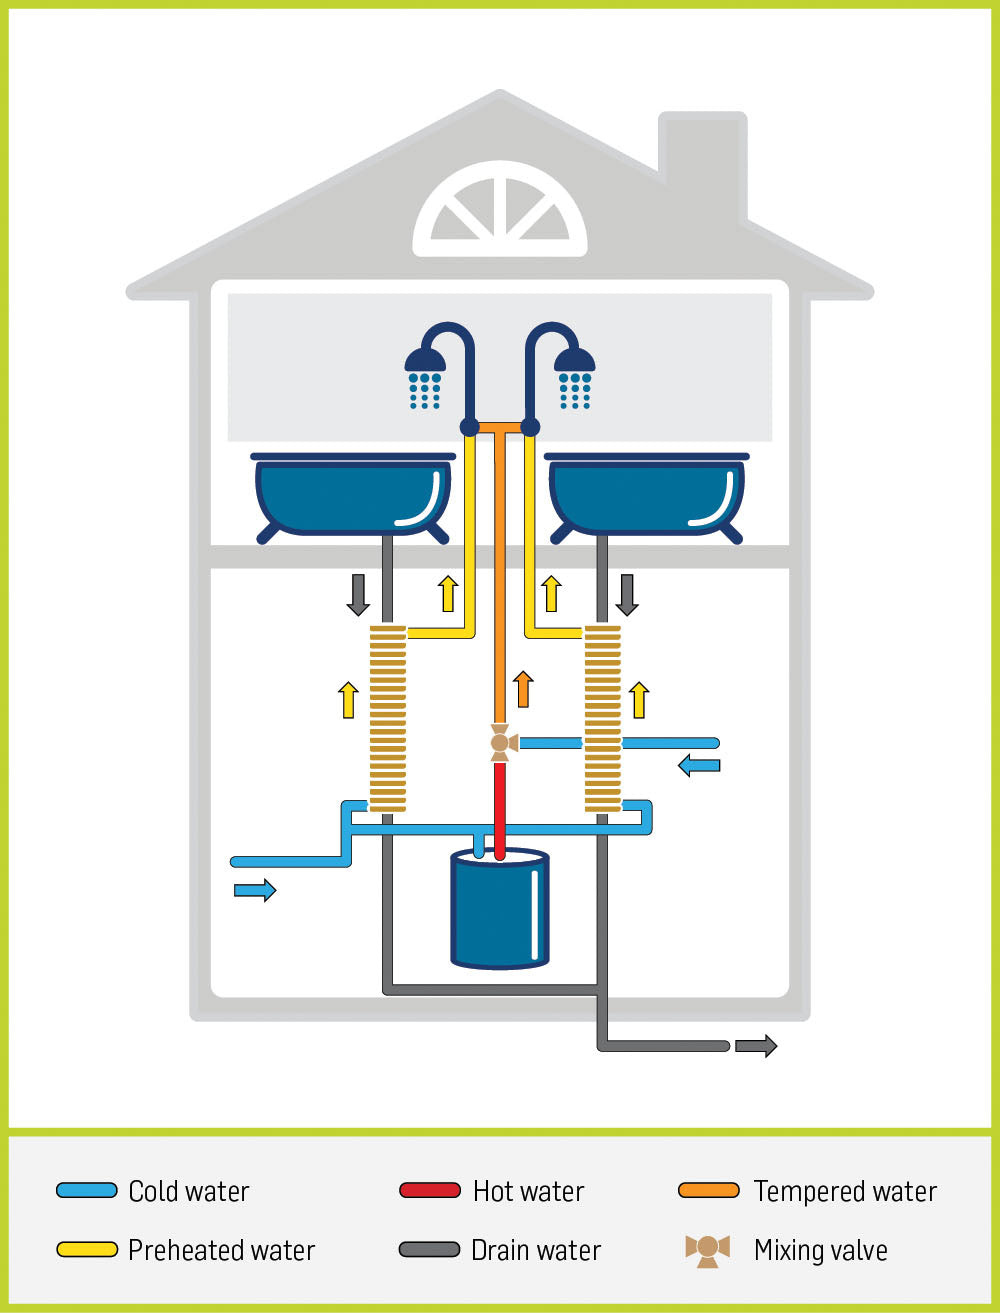
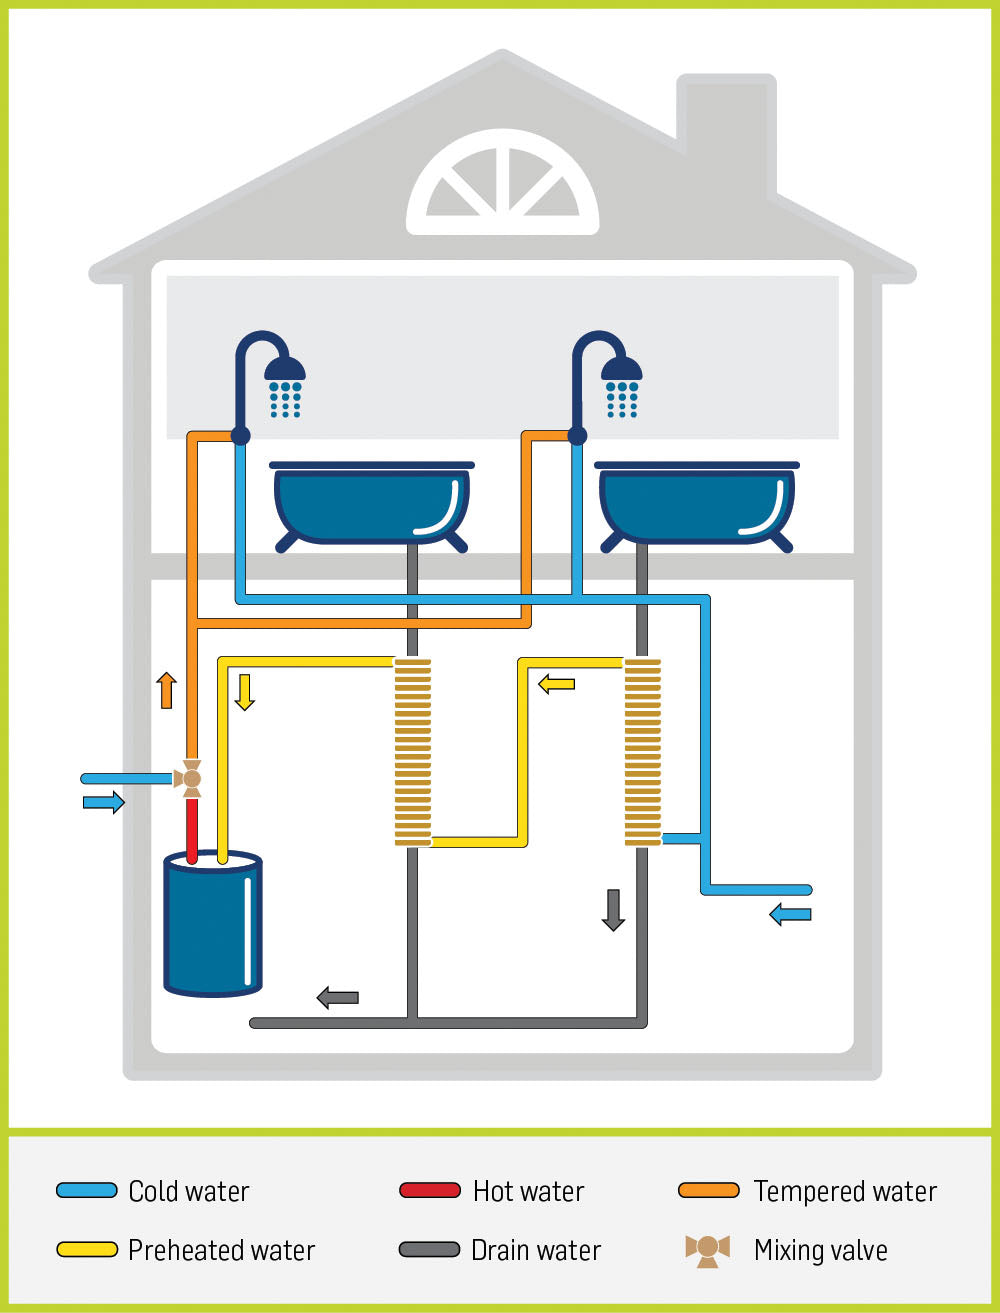
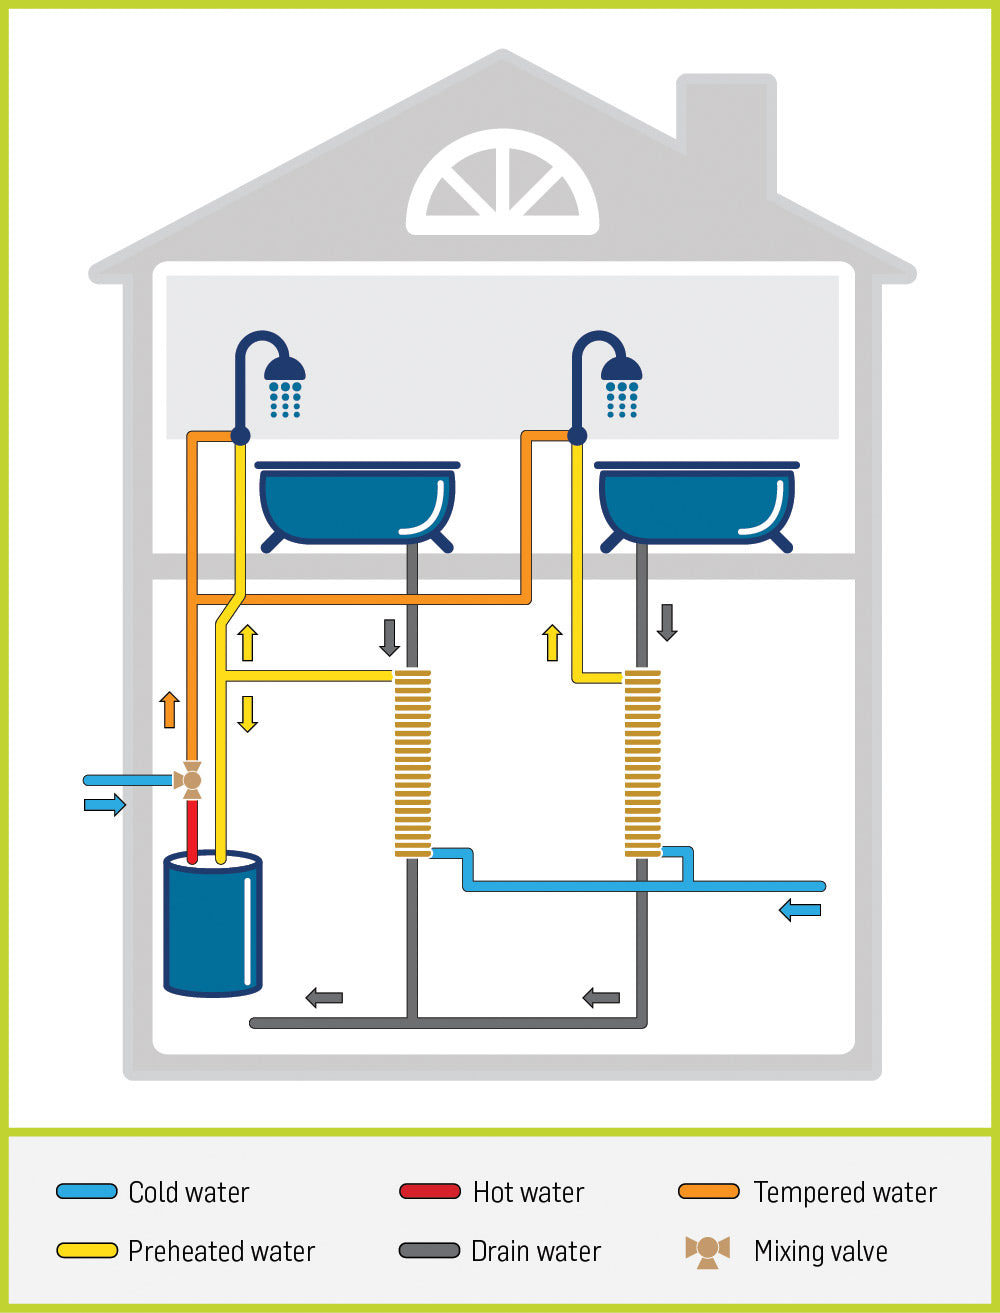
Step 1: The Main Drain Connection
- Measure and Cut: Cut out a vertical section of the existing main home drain pipe directly below the primary shower location. Ensure the model line of the ThermoDrain you are working with matches your home's drain stack diameter. (For the exact physical cut out measurements, please refer to the model-specific engineering installation manuals below).
- Mount Inline: Secure the top and bottom of the ThermoDrain to the freshly cut open ends of your drain pipe. Use regular ABS solvent cement for the TDX series, or fasten the heavy-duty mechanical rubber couplings over the joints for the TDH series to establish a permanent, leak-proof structural seal.
Step 2: The Cold Water Supply Connection
- Plumb the Inlet: Connect the fresh, incoming cold water main supply line directly to the bottom port of the ThermoDrain coil (this functions as the cold water inlet).
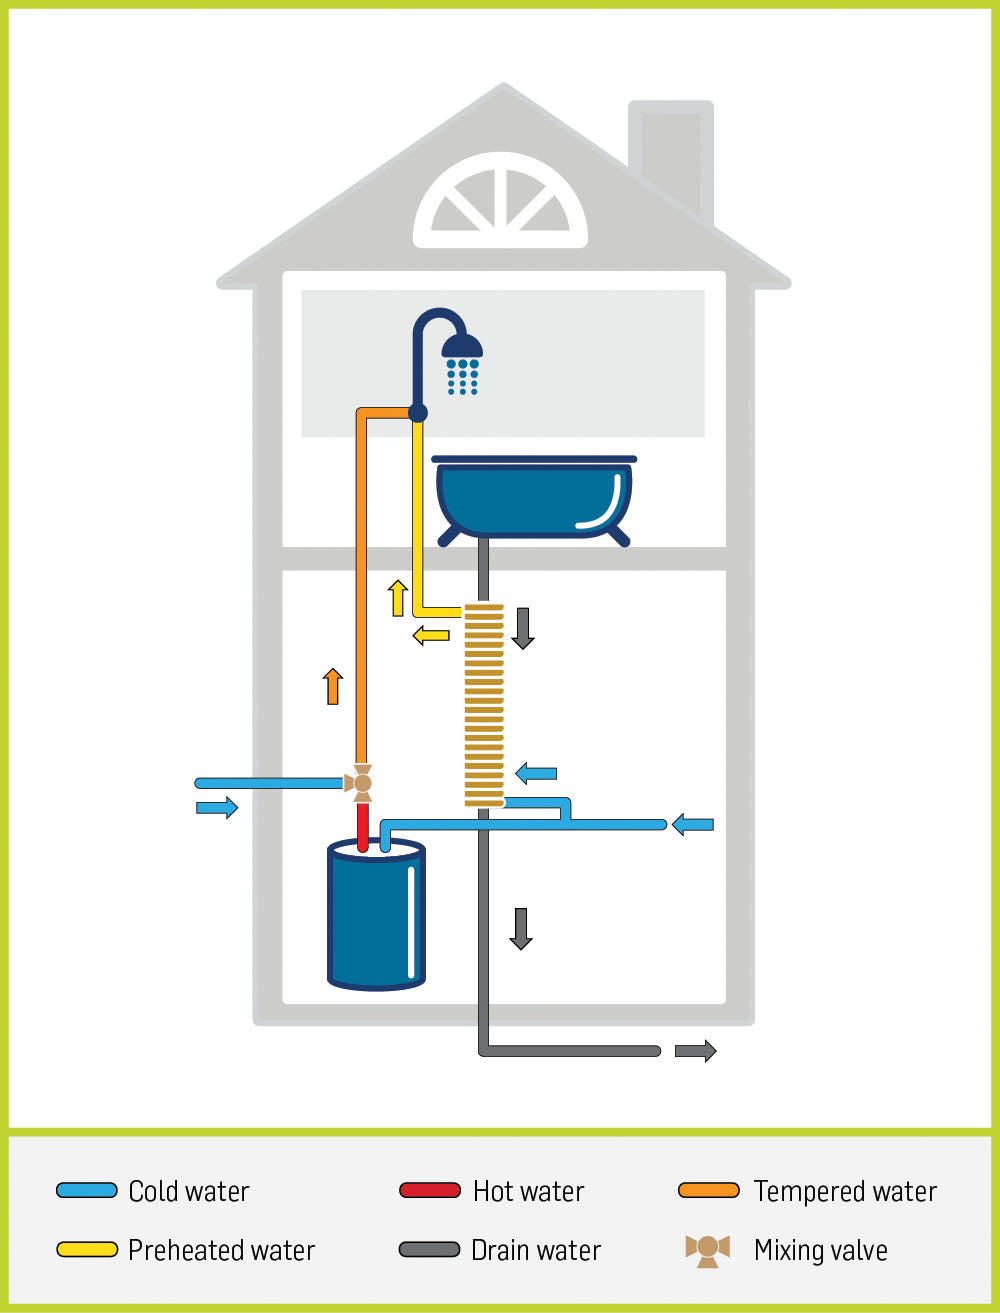
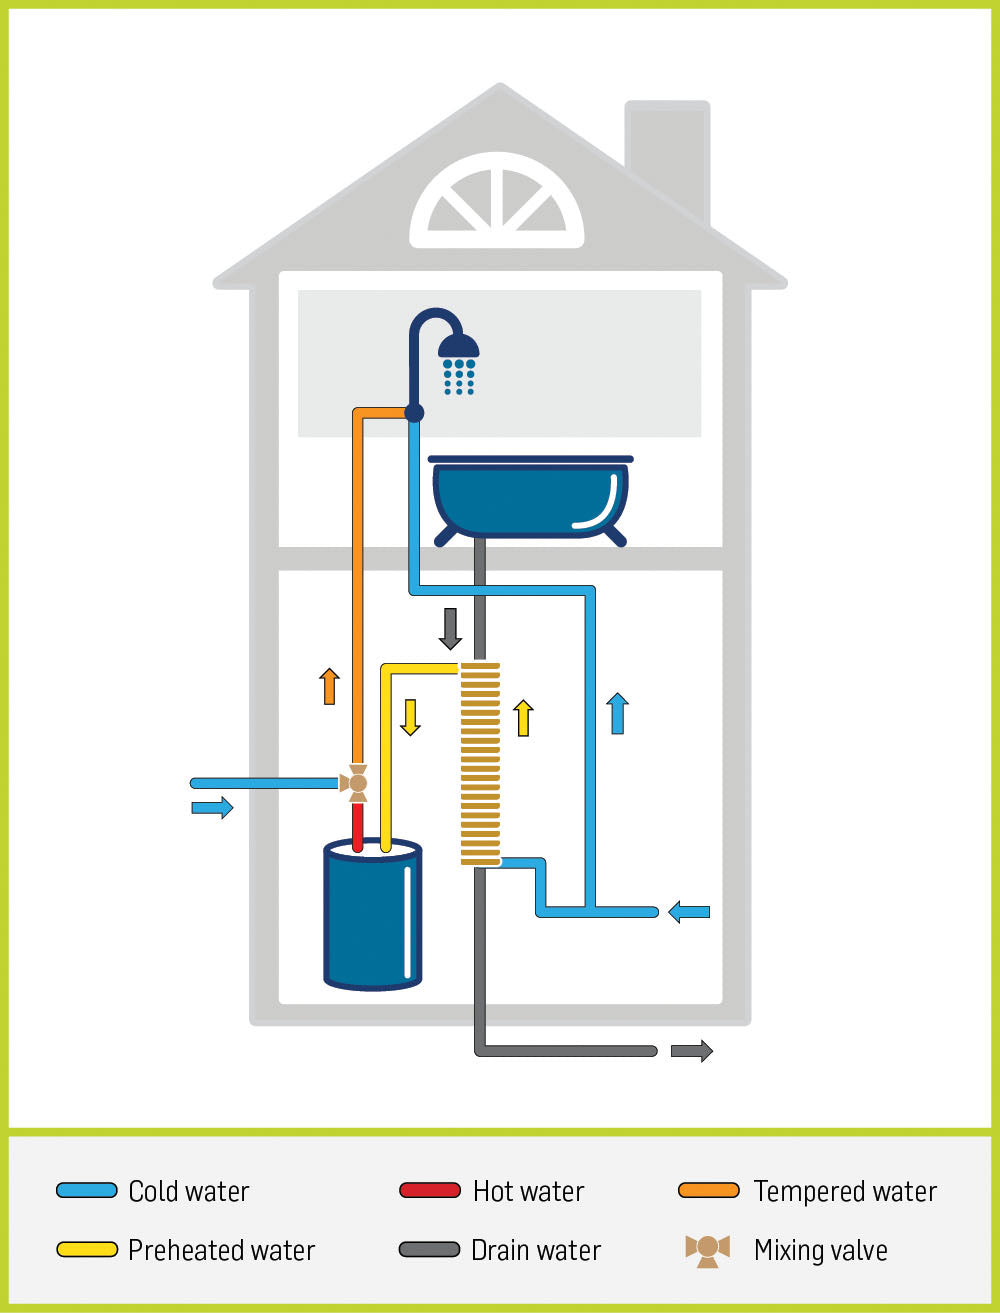
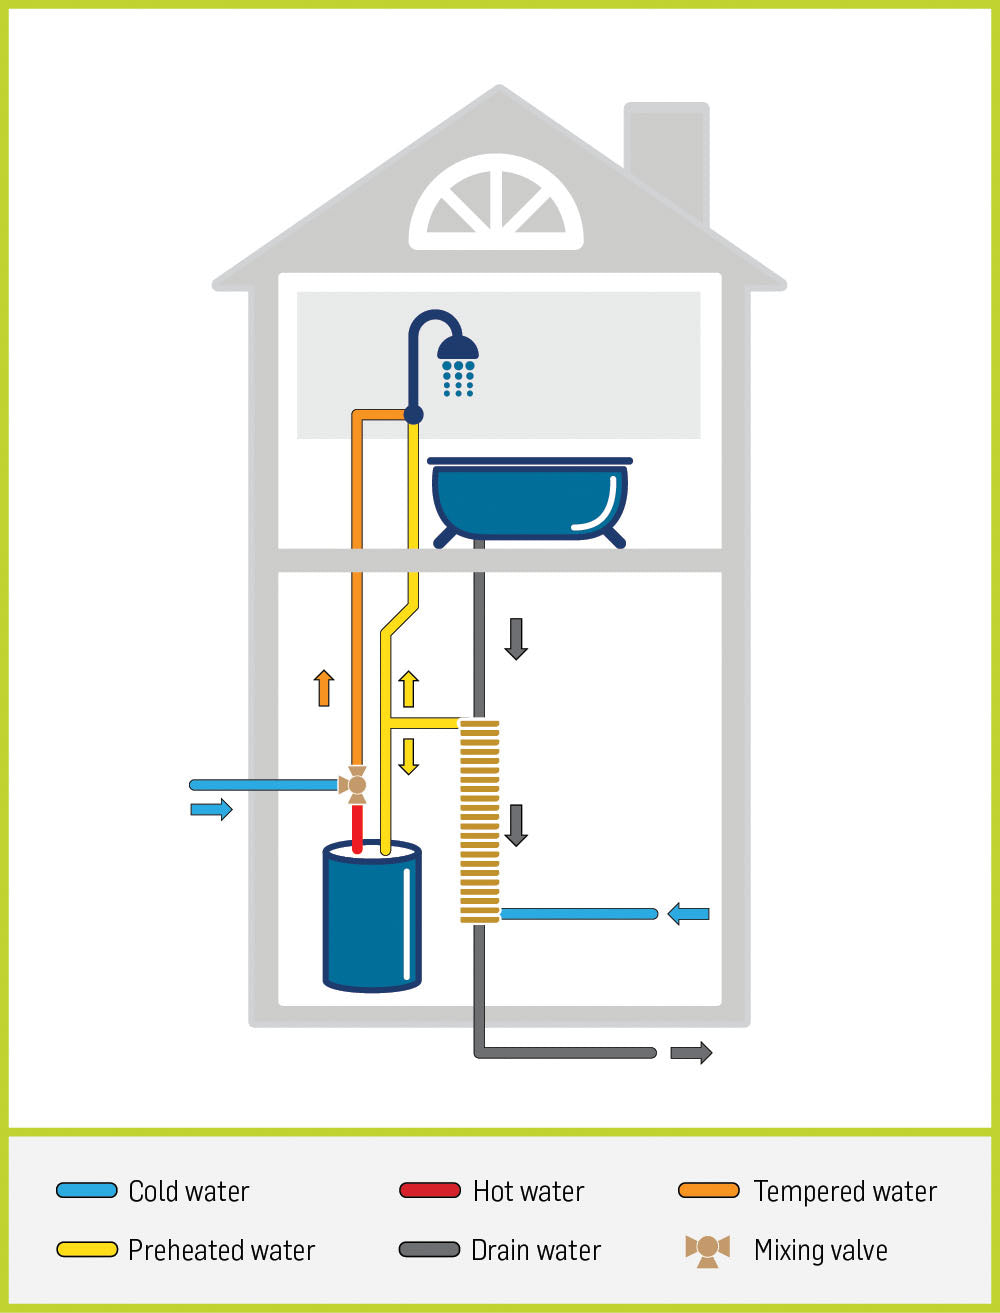
- Plumb the Outlet: Connect the top port of the ThermoDrain coil (this functions as the preheated water exit) using one of the following three custom plumbing configurations:Option 1 (Equal Flow/Fixtures Only): Route the preheated line straight to the cold-water inlet side of the shower valve mixing assembly.Option 2 (Equal Flow/Tank Only): Route the preheated line straight to the cold-water inlet supply port of your water heater tank or tankless unit.Option 3 (Combined Equal Flow — Highly Recommended): Route the preheated line to split evenly, feeding both the shower's cold water mixing valve and the water heater's cold water inlet simultaneously. This balanced configuration delivers the highest possible thermal energy recovery efficiency.
ThermoDrain Engineering Specification Sheets & Manuals
Click below to access our full library of certified Intertek and CSA engineering submittals, architectural sizing files, and shop drawings:
- 3″ TDX Series (Next-Gen Compact & Direct ABS Glue) 📄 [Download TDX Series Specification Sheet (PDF)]
- 3″ TDH Series (Traditional Copper Core with Mechanical Couplings) 📄 [Download TDH 3-Inch Series Specification Sheet (PDF)]
- 4″ TDH Series (High-Capacity Commercial Applications — No Couplings Included) 📄 [Download 4-Inch Commercial Series Specification Sheet (PDF)]
- Multi-Residential & Commercial Systems Portfolio 📄 [Download Complete Multi-Residential Engineering Technical Binder (PDF)]
ThermoDrain BASIC installation applications
MULTI-SHOWER AND MULTI-RESIDENTIAL THERMODRAIN INSTALLATION
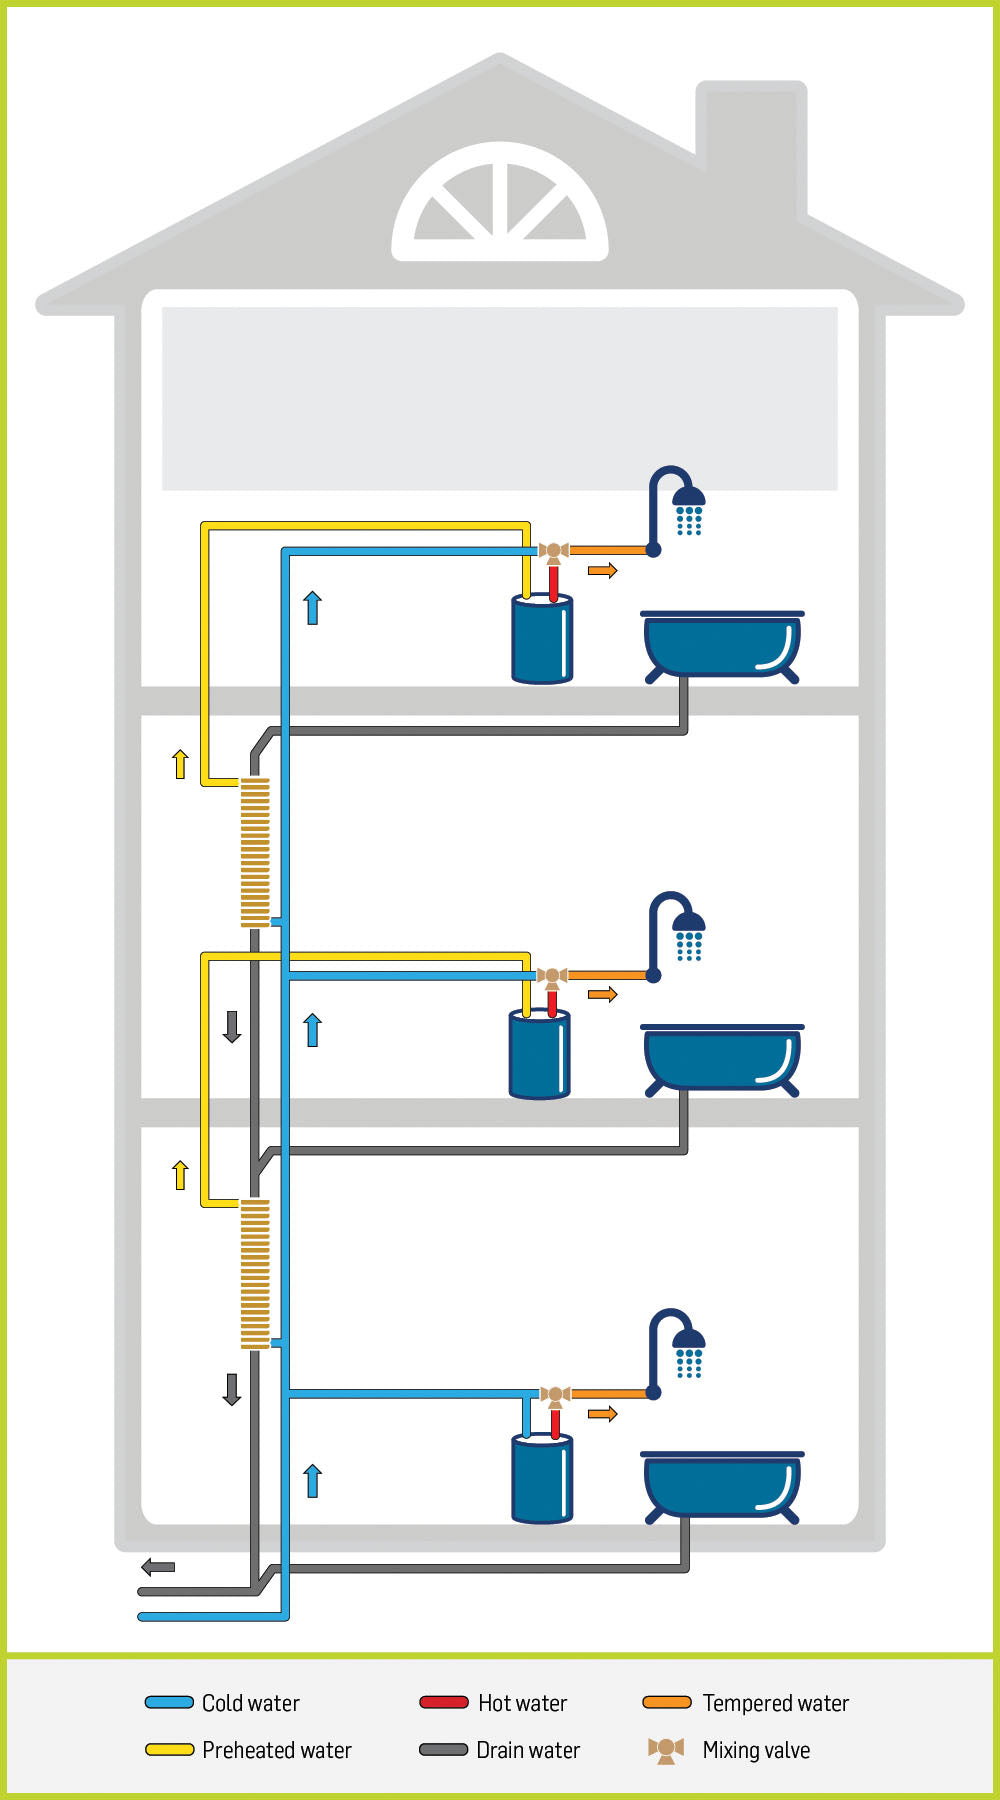
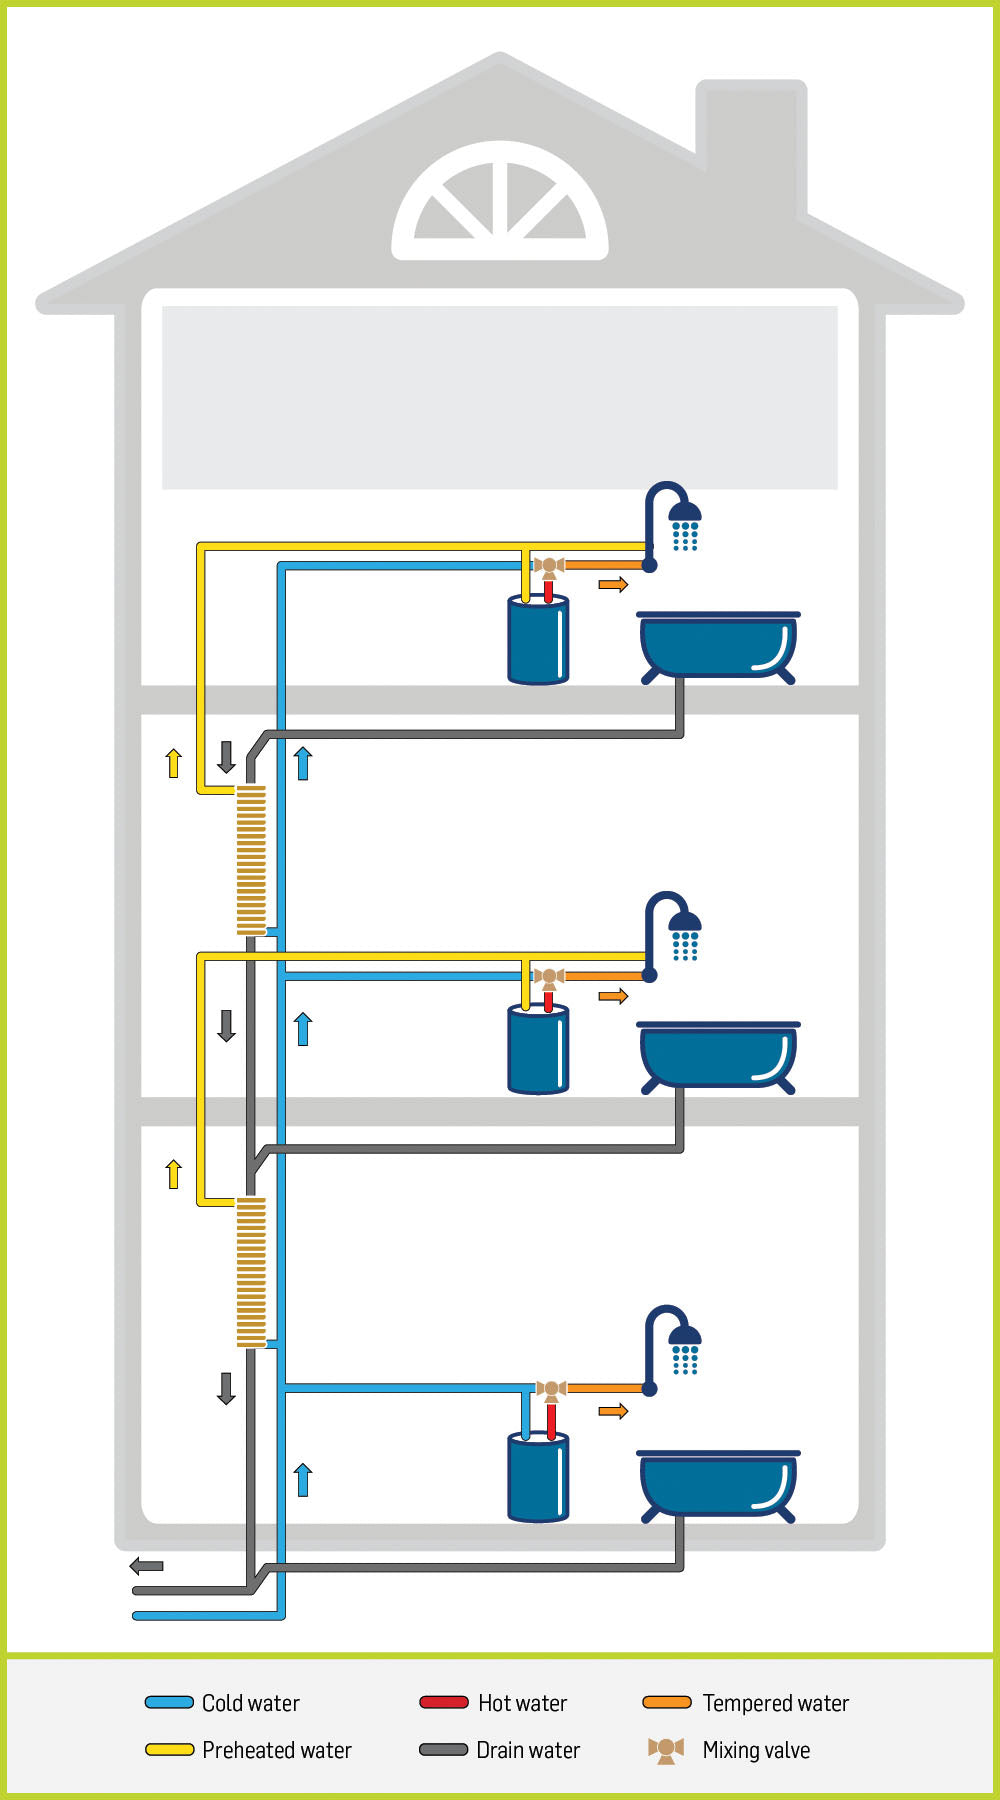
PERFORMANCE VERIFIED AND SAFETY CERTIFIED
ThermoDrain Specification sheets
- 3″ TDX Series (Superior performance and compact, easy installation)
TDH 3″ SERIES PDF COPY AVAILABLE HERE FOR DOWNLOAD
- 3″ TDH Series (Advance technology with High efficiency, high performance unit)
TDH 3″ SERIES PDF COPY AVAILABLE HERE FOR DOWNLOAD
- 4″ TD Series (Commercial, high volume multi residential and Institutional)
TD 4″ PDF COPY AVAILABLE HERE FOR DOWNLOAD
Featured collection
-
TDX Compact | TDX3240 (33.59% Efficiency)
Regular price $197.33 USDRegular priceUnit price per -
TDH Compact Value | TDH3320B (41.0% Efficiency)
Regular price From $352.46 USDRegular priceUnit price per$0.00 USDSale price From $352.46 USD -
TD Commercial High-Flow | TD442B (46.0% Efficie...
Regular price $746.00 USDRegular priceUnit price per$0.00 USDSale price $746.00 USD -
TDH Building Code Pro | TDH3335B (42.1% Efficie...
Regular price $404.96 USDRegular priceUnit price per$0.00 USDSale price $404.96 USD -
TDH NetZero Pro | TDH3620B (57.2% Efficiency)
Regular price $746.96 USDRegular priceUnit price per$835.07 USDSale price $746.96 USDSale